
You don’t always have to invest thousands of euros to build an enterprise-level networking: here’s our test of the Quanta LB4M switch
Quanta is a worldwide leader company in the development of ODM (Original Design Manufacturer) hardware products, that is, designed and manufactured for third parties. Among the brands that enjoy Quanta’s products we signal HP, IBM and Dell. The Cloud Technology department of the Taiwanese company instead directly sells a variety of datacenter level solutions that spans from networking devices to servers.
This month we tested a switch particularly renowned on forums and blogs suitable for the creation of networks and enterprise infrastructure even when the budget is particularly tight.
LB4M is, indeed, very interesting for those who want to experiment high-end features without spending thousands of euros.
Respectable specs
It’s described as a Layer 2 and Layer 3 switch with IPv6 and clustering features, however the unit we tested, bought from one of the several vendors on eBay, only includes Layer 2 features. It’s a limitation of the software, as the switch is built upon two Broadcom BCM 56514 chips (each chip supports up to 24 GbE ports) capable of managing natively all the aforementioned features.
The Operative System is VxWorks of the Californian Wind River Systems. It’s an Unix-based solution often used on embedded systems, and in our case is v 5.5.1. The use of a Qualcomm chipset is evident also in the software: the Fastpath QoS package of the same American company is implemented.
The switch offers 48 Gbit ports and 2 10 Gbit SFP+ ports that makes it stackable (Quanta however specifies that the installed firmware is decided by each single vendor, on a software implementation perspective) and suitable to scenarios that require a strong scalability. These ports can function in 10 GBE switching mode, or in HiGig+ Uplink mode.
A network RJ45 port dedicated for the management of the switch is found on the chassis, as well as a RJ45 serial port for the console connection. On the back, in addition to the air inlets for the cooling fans, there’s place for two power supply (that can be hot added) and 3 easily replaceable fans.
Essential and well-balanced structure
At first glance, the graphical interface is minimal and schematically organized. The features, organized in four macro-categories, each one populated by several menu items, can be accessed from the left column
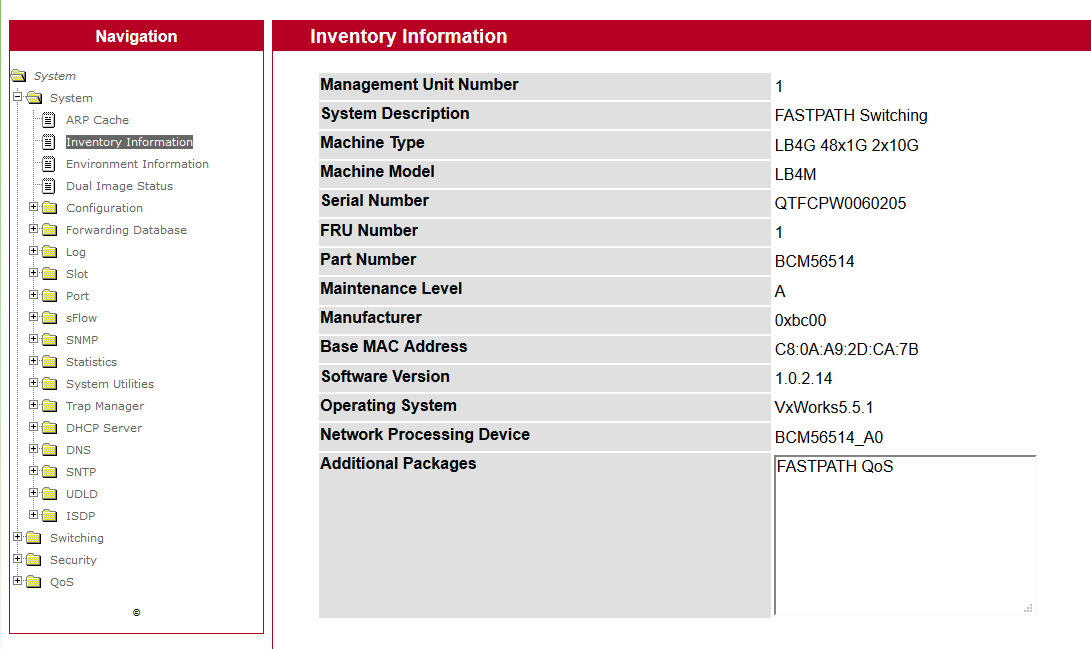
The general configuration area is accessed from the System tab, which also included information about hardware and firmware, in addition to system logs and networking functions like the setup of DHCP server, DNS and Ethernet ports configuration. In the dedicated menu, each port can be configured, have a description attached and the complete list of ports, with the state of each port, can be consulted. The Statistic section is quite useful as it allow to monitor the traffic, both on a global and on a per-port side; the System Utilities contains fundamental features like configuration saving, device reset and the upload of configuration files or updates.
VLAN and advanced Networking
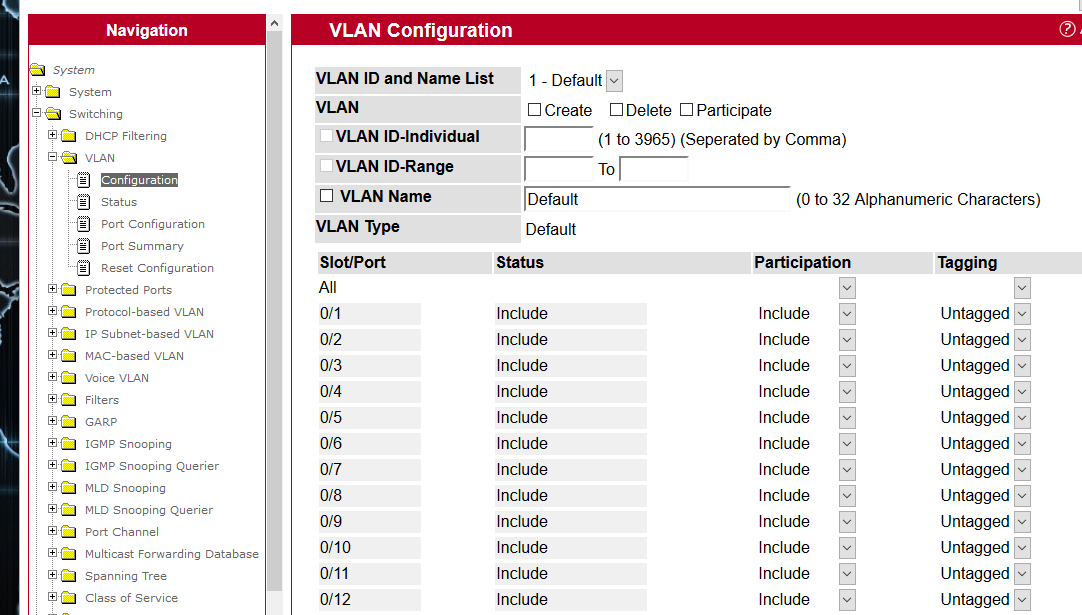
To enter the core of the networking, access the Switching menu. From here, Layer 2 features are available, on top of that VLAN setup. VLANs can be implemented with different criteria: protocol based VLANs, IP or MAC based or Voice VLAN (dedicated to telephony). Virtual LANs can be created from the Configuration pages and their creation is quite intuitive. In the top part, the virtual network can be selected (or created) and in the bottom part the VLAN participation and the optional tag. Modifications can be made also from the dedicated menu, available at the menu voice Port Configuration. IP or MAC based configuration is easily realised too: you should enter the host address and the ID of the selected VLAN to complete the association.
Among the features of the rich menu dedicated to Switching, we can find: IGMP Snooping, Multicast Forwarding, Spanning Tree, Port Security and LLDP. Security features are fundamental on an enterprise-oriented switch: under the Security item there’s place, among others, for the configuration pages of the RADIUS, TACACS+, HTTPS and Secure Shell protocols, in addition to the access privileges management for each port.
LB4M is a very interesting product for sure, thanks also to the appealing price/performances ratio (street price of a used unit spans from 90 to 200€), but some limits are present nonetheless, both on a practical and on a usage basis.
It’s loud: when starting and when operating, cooling fans are quite loud and make the switch a bad choice for situations where a dedicated space is not present (server halls, labs, rack, etc). As far as features are concerned, it’s fundamental to understand before purchasing which ones are available and which ones are missing: in our case the absence of Layer 3 features, Clustering and IPv6 makes the product less interesting in certain use cases.
If you have ordered, or already own, a switch of this kind, the initial configuration might not be easy and immediate. We have gathered for you a few guide lines so that you can quickly start working with it without having to read more than 900 pages of the manual (LINK).
| Technical specs | Quanta LB4M |
|---|---|
| Chipset | Qualcomm BCM56514 |
| Porte Gigabit Ethernet Ports | 48 10/100/1000Base-T RJ45 |
| Porte 10 Gigabit Ports | 2x SFP+ |
| Web management | Yes |
| SUpported protocols | 802.1D STP, 802.1S MSTP, 802.1w Rapid Spanning Tree |
| VLAN | 802.1Q VLAN, Protocol-based VLAN, Subnet-based VLAN, MAC-based VLAN, Voice VLAN |
| QoS | Yes |
| Security | SSH v1/2, SSL 3.0, TLS 1.0 |
| DHCP/DNS/SMTP | Yes |
| Statistics | Yes |
| Power supply | 2x Delta Electronics 300W |
| Cooling system | 3x interchangeable fans |
First steps with the switch
1) By default, all the Ethernet ports are off, so the Web interface is not accessible before any configuration.
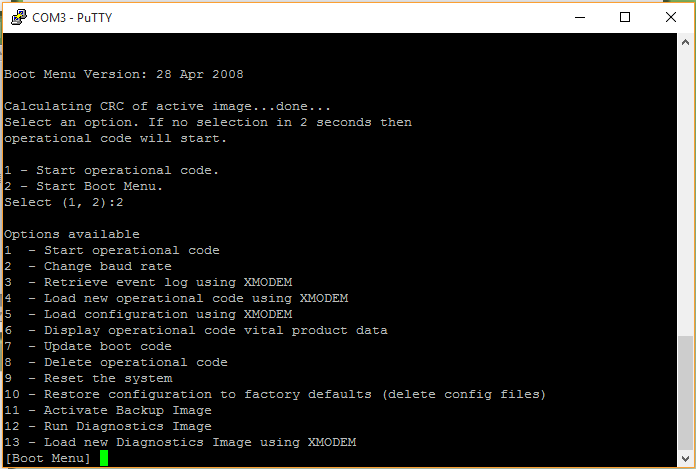
2) To start, connect through console (with an RJ45-Serial cable) using a client like PuTTY. Be careful of selecting the correct COM port and the proper baud rate of 9600.
3) After powering the switch on, you can decide the starting mode: from boot menu or from the last saved configuration.
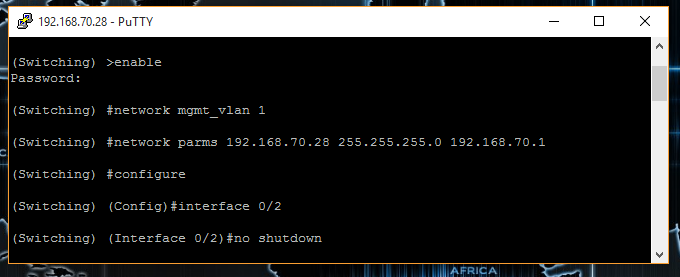
4) Once the system is on, you can activate at least one Ethernet port to enable the configuration mode with the Web interface (we have enabled port 2 in the following example)
enable
(press enter when prompted for a password)
network mgmt_vlan 1
network parms 192.168.70.28 255.255.255.0 192.168.70.1
configure
interface 0/2
no shutdown
5) As always with the devices of this tier, it’s fundamental to save the configuration after any modifications that will get lost at the next reboot otherwise. You can do that from the Web interface (the System Utilities item of the menu), before powering the switch off or resetting it.